
With all the issues I was having with my old ISP, I decided to make the leap and move onto Optus 5G Home Internet.
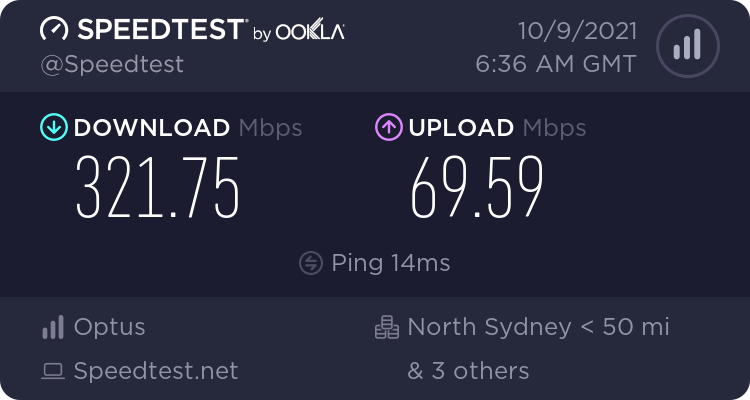
My experience so far has been pretty stellar and I'm currently paying the same amount as I was with my previous provider for quicker speeds. The result below is regularly achievable even during peak hours and factors like rain don't seem to influence speeds too much.
CGNAT Struggles
The only downside thus far of moving onto Optus 5G has been having to work around CGNAT.
For those who aren't aware, ISPs use CGNAT to stretch a limited pool of public IP addresses and it means you don't get a publicly routable IP address. This means you can only make outbound connections which is a problem for me because you need to get to this blog that's hosted on this connection.
Looking at the ISP provided router we see I've been allocated a WAN IP of 10.146.13.145.
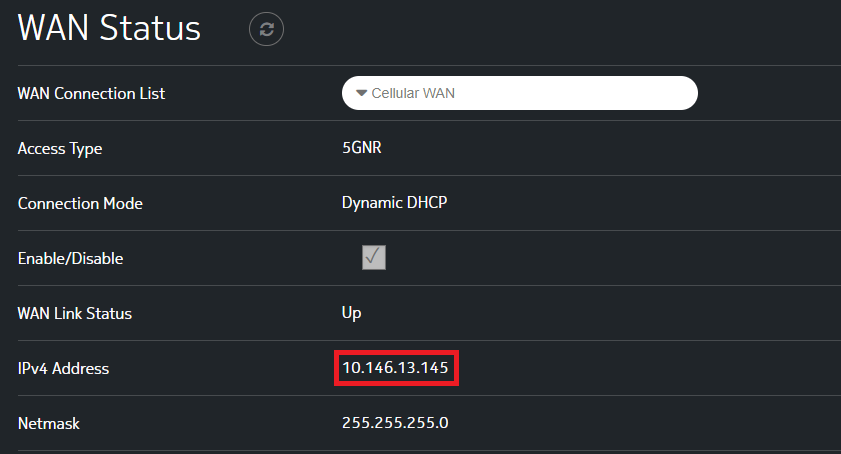
Side note: Mildly interesting that they didn't bother using the RFC CGNAT range of 100.64.0.0/10.
The Options
A quick Google for solutions showed two popular options:
- Setup a VPS and port forward with SSH/OpenVPN+iptables
- ngrok
Both are feasible, however the VPS solution is a bit clunky and ngrok incurs a minor cost (to use custom domains) for what would be a limited use service.
The Solution I Found
Introducing Cloudflare Tunnel (previously Cloudflare Argo). Cloudflare Tunnel works similarly to ngrok and as of April 2021 it's free!
https://blog.cloudflare.com/tunnel-for-everyone/
Functionally, it works in a similar way to ngrok. An outbound connection is made towards Cloudflare and inbound traffic is tunneled to your network over this established session. Cloudflare even takes care of SSL termination and certificate management.
Setup is pretty straight forward and the only caveat is that your DNS needs to be hosted with Cloudflare which was already the case for me.
- Download and install cloudflared somewhere. I opted to build a seperate VM to serve this purpose.
dpkg -i cloudflared-stable-linux-amd64.deb - Follow the steps to login to your Cloudflare account.
cloudflared tunnel login - Create a tunnel, note I'm using a single tunnel to serve multiple hostnames/services.
cloudflared tunnel create argo - Setup cloudflared to run as a service.
cloudflared service install
systemctl start cloudflared
systemctl enable cloudflared - Create a config file that references the tunnel ID and credentials file from the step 3.
root@proxy:/etc/cloudflared# cat config.yml tunnel: tunnel-ID credentials-file: /root/.cloudflared/tunnel-ID.json ingress: - hostname: eddiez.me service: http://internal.ip:80 - hostname: other.host service: hhtp://other.internal.ip:80 - service: http_status:404 - Create CNAME records in Cloudflare to point to tunnel-ID.cgargotunnel.com
- That's it!